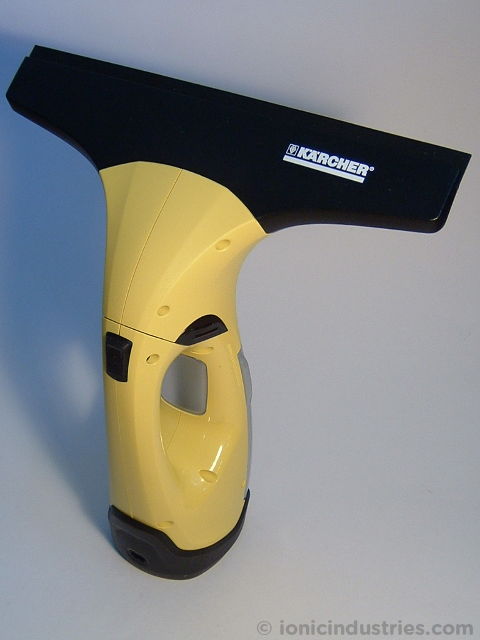
This guide will take you through how to open the Karcher WV2 Window Vac and repair it by replacing the internal rechargeable battery when the battery has failed and is not charging. A failed battery is one of the common causes of the Window Vac not charging and running. The tutorial is based on the yellow WV 2 model but is applicable to other Window Vac and Window Cleaner models from Kärcher including the WV 50, WV 55, WV 60, WV 70 and the Plus, Premium, White and Classic variants. The model number of your Karcher is marked on the body of the Window Vac, usually behind the water collection reservoir.
The basic method is:
- Open and dismantle the Window Vac
- De-solder the old rechargeable battery
- Solder in the replacement battery
- Reassemble the Window Vac
This is documented in detail below along with lots of pictures. Click on any picture to enlarge it.
Disclaimer
Any damage to yourself, your device or anything else is entirely your responsibility. This guide is for professional, educational purposes only and is offered without guarantee or liability.
Warning: Lithium-ion batteries are volatile and if shorted or overheated they will go into thermal runaway and ignite creating a severe burn hazard. Do not short-circuit, disassemble, crush or expose contents to water. Lithium reacts violently in water like Sodium and Potassium did in those science experiments at school!
Video
We have also created a short video from this guide to Karcher Window Vac WV2 Battery Replacement on our YouTube channel, which you can also watch below.
Tools / Parts / Equipment
- Karcher WV2 Window Vac
- Compatible charger
- Soldering iron: Electronics grade (about 18-25 watt) with chisel tip
- Solder: Lead-free silver solder is great for this
- Solder sucker (also known as a desoldering pump) and/or desoldering braid
- Small flat-bladed screwdriver: 2 to 3mm wide
- Large flat-bladed screwdriver: 5 to 6mm wide
- Electrical insulation tape
- Craft knife
- Torx T-8 screwdriver (star-shaped bit). Support us by buying from Ionic Industries here
- Replacement Window Vac battery with solder tags. Support us by buying from Ionic Industries here
How-To
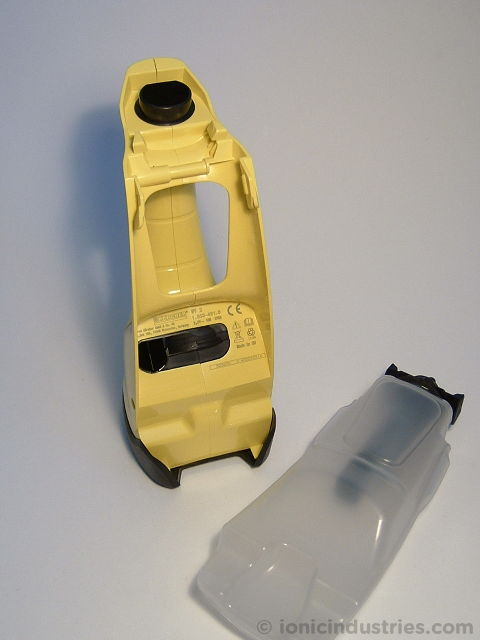
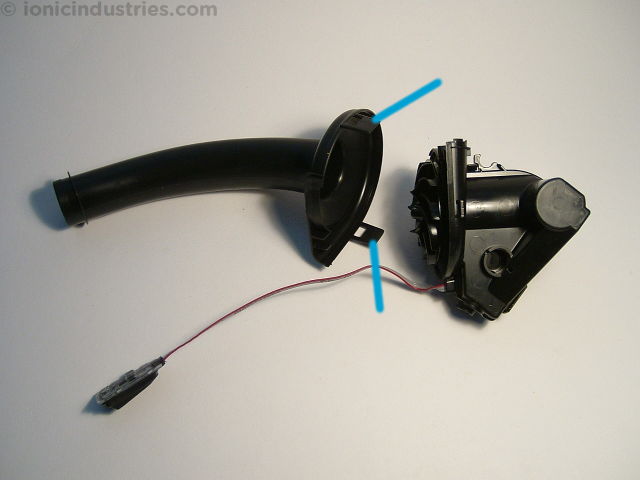
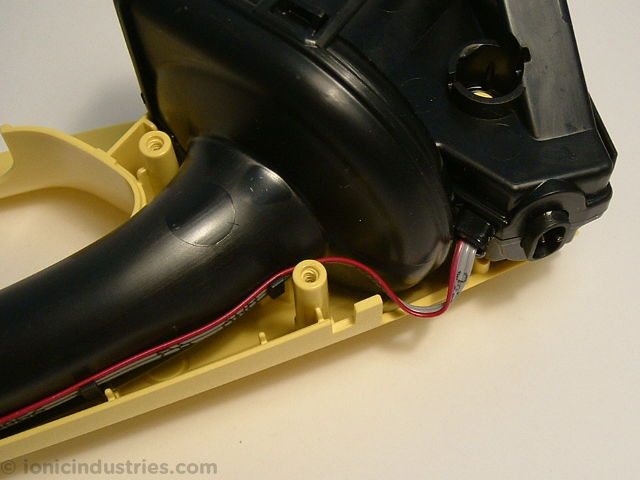
To start with, empty the water reservoir then unclip the blade and head assembly of the Window Vac from the main body.
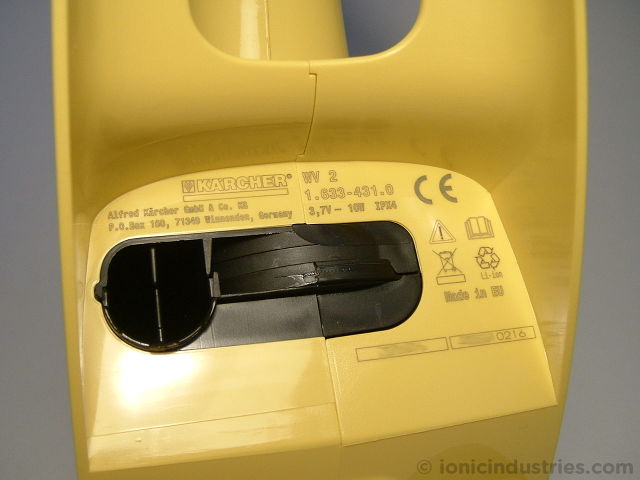
Unclip the reservoir. You can see your Window Vac model number and other details on the body. This is a WV 2 model made in 2016.
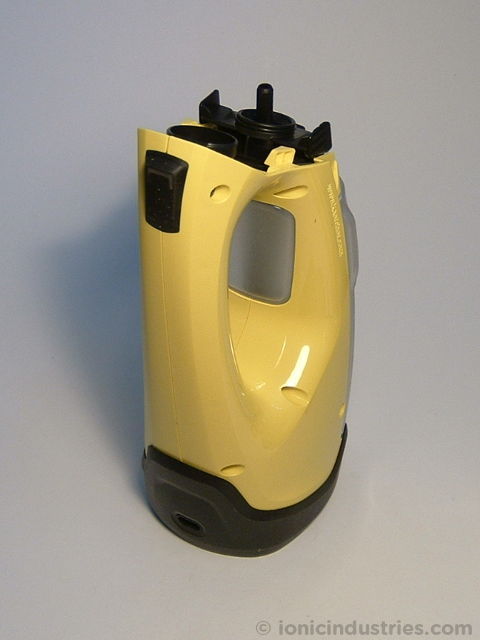
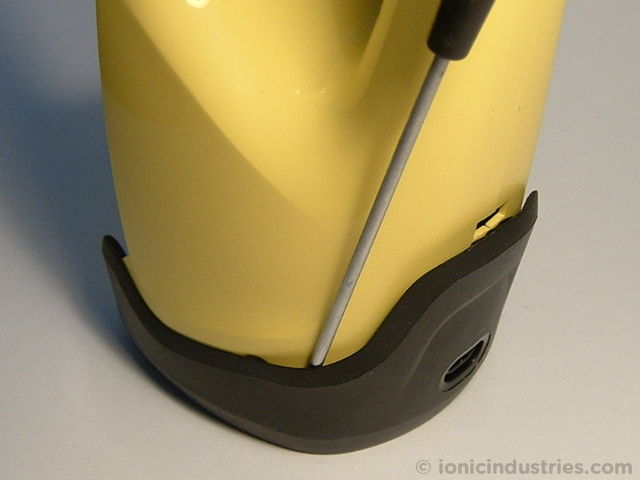
Unhook the back of the black plastic base cover and pull it down slightly so it partially covers the recharging socket.


Using the screwdriver unhook the 2 recessed clips in the bottom of the base cover. These are arrowed below for clarity.
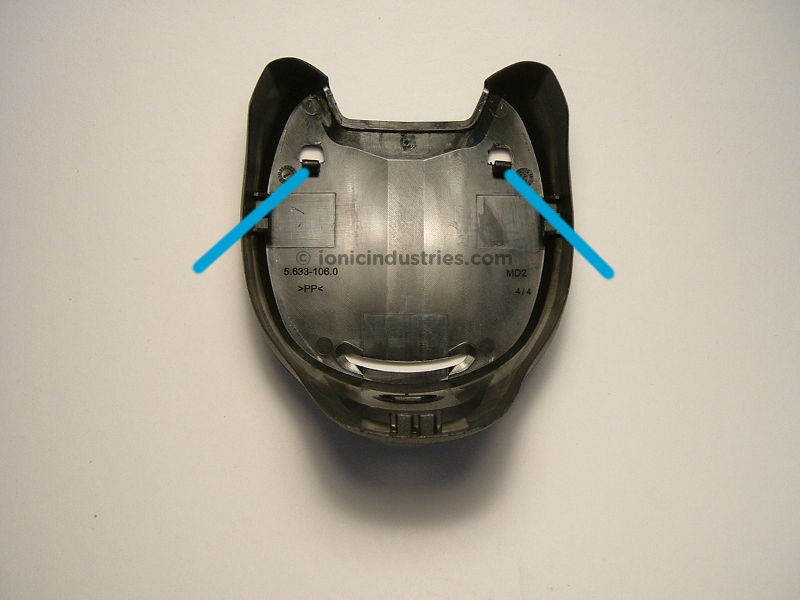
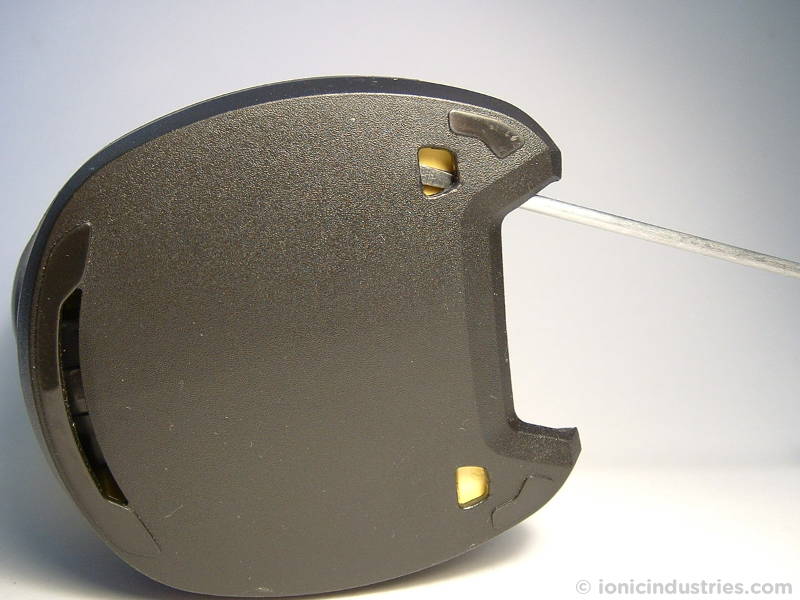
Unclip the side-clips and remove the base cover.

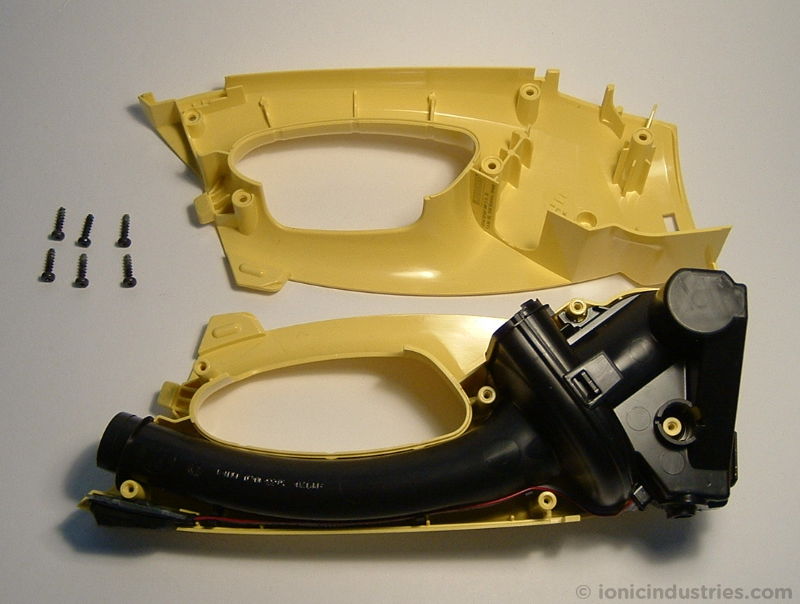
Using a Torx screwdriver of the correct size (T-8 size, available online via Ionic Industries here) remove the 6 screws from the side of the Window Vac.
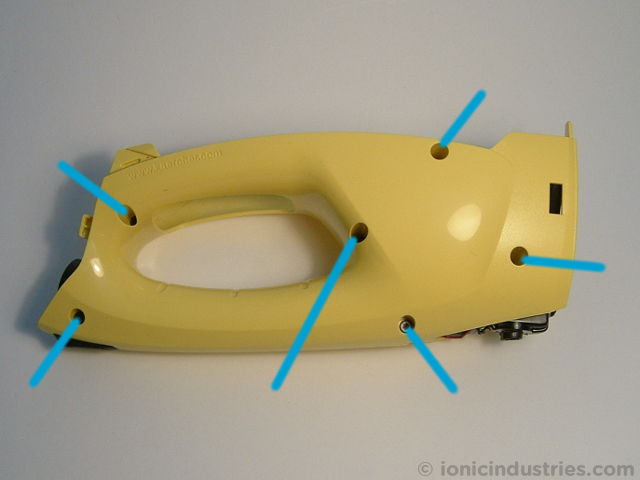

Carefully remove the side of the Window Vac, making sure you don’t pull any internal cables.
Lift out the power switch, unhooking its cable from the first clip.
Lift the suction assembly out of the remaining side of the yellow casing.
Unhook the power switch cable from the rest of its clips

Unclip the suction pipe from the motor housing. Clips are arrowed below.
There are 3 clips holding the motor housing together, arrowed below.
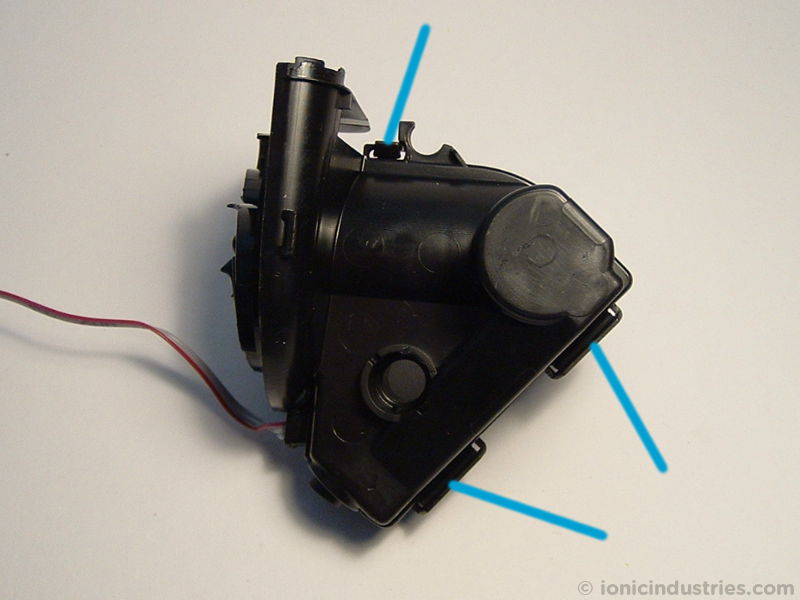
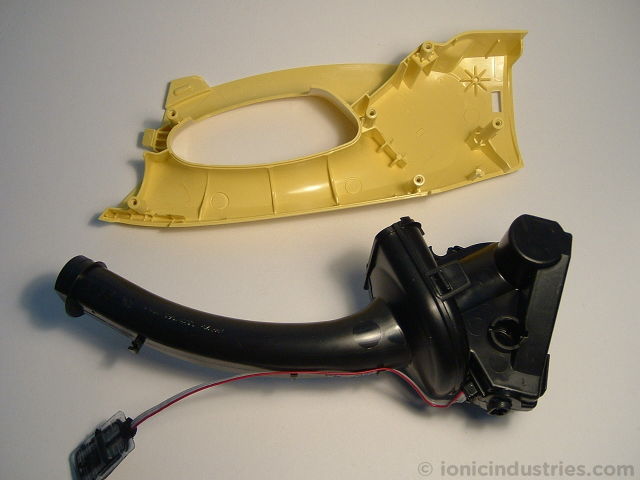
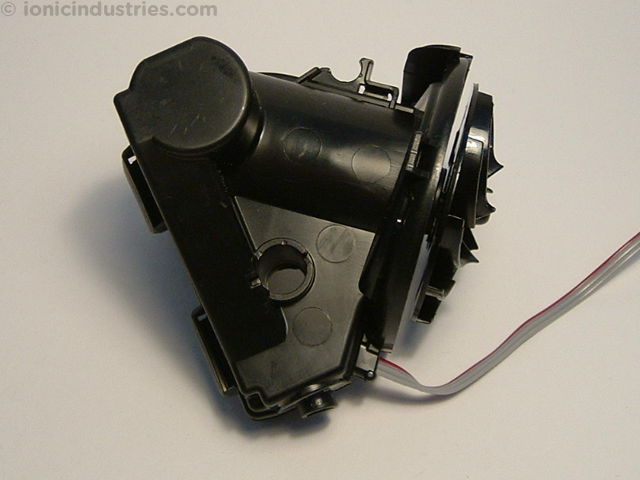
Release the clips and carefully remove the side of the motor housing, making sure you don’t pull any internal cables. Try to leave all the internal parts in the remaining piece of the housing.

Note the flexible seal (white) and grease around it in the piece of motor housing removed.
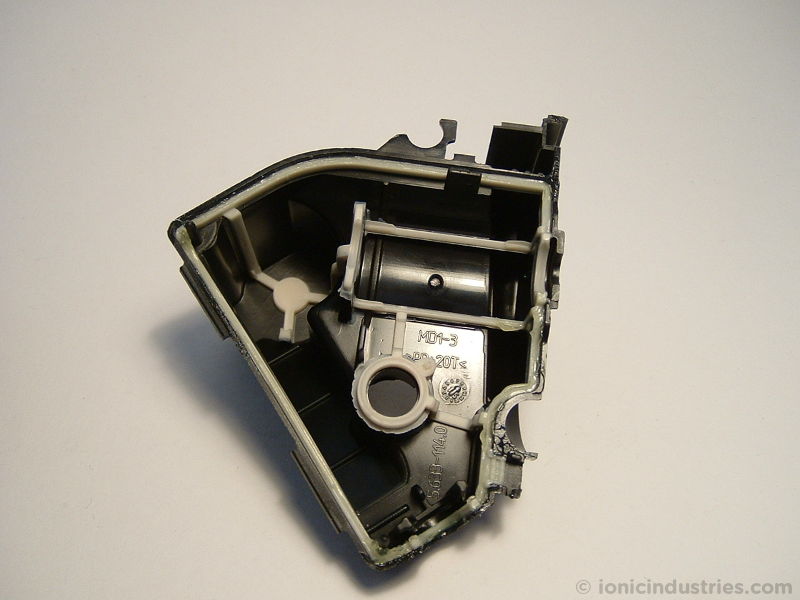
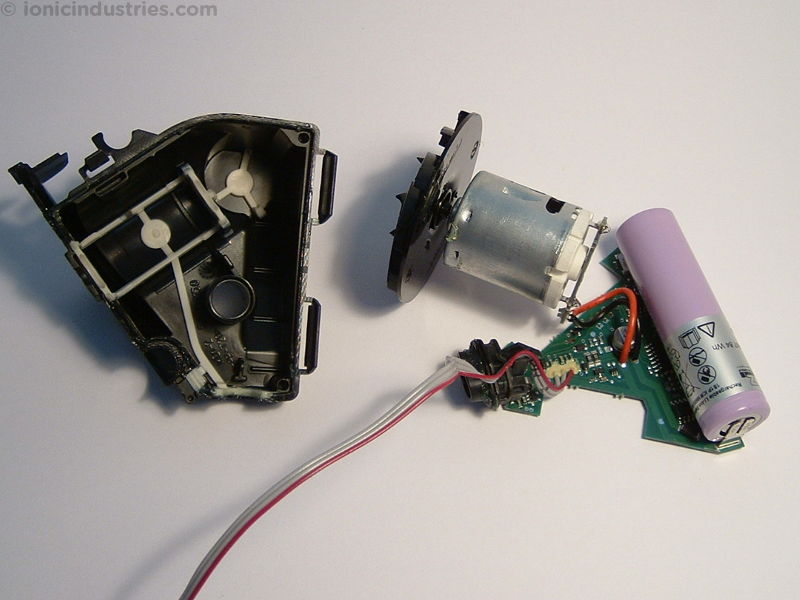
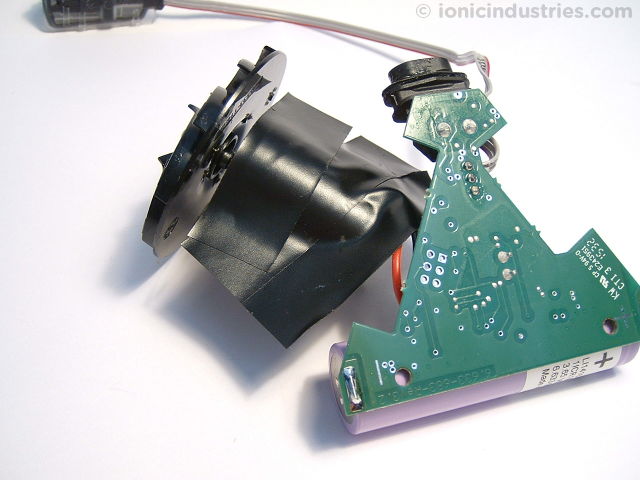
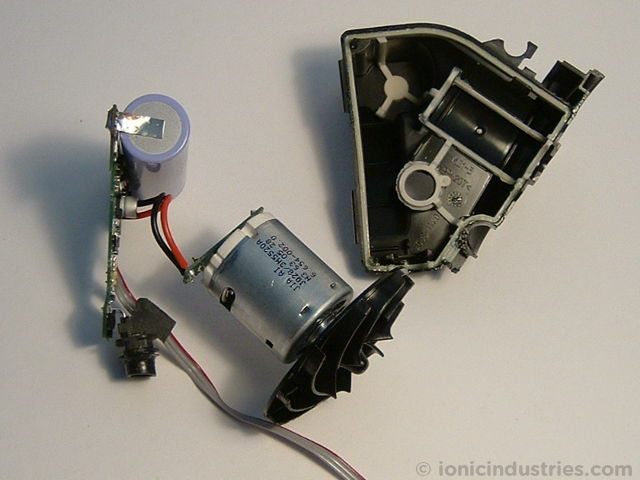
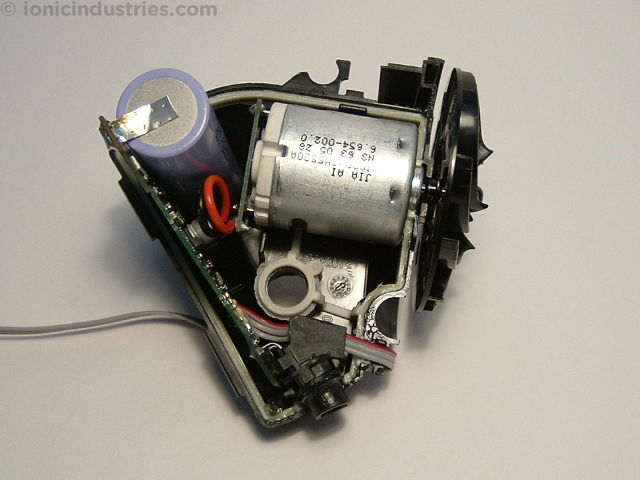
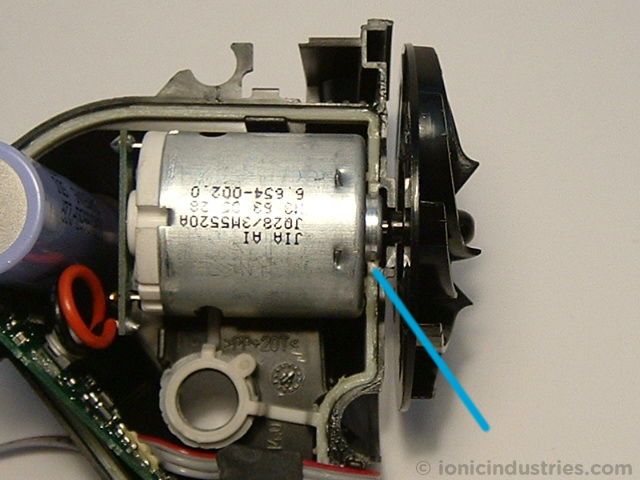
Carefully remove the motor and PCB assembly from the housing.
Check that the impeller blades on the end of the motor can spin freely. If the motor is seized or stiff this could be the cause of the fault so apply a drop of light oil (not WD-40) to each end of the shaft, arrowed below.


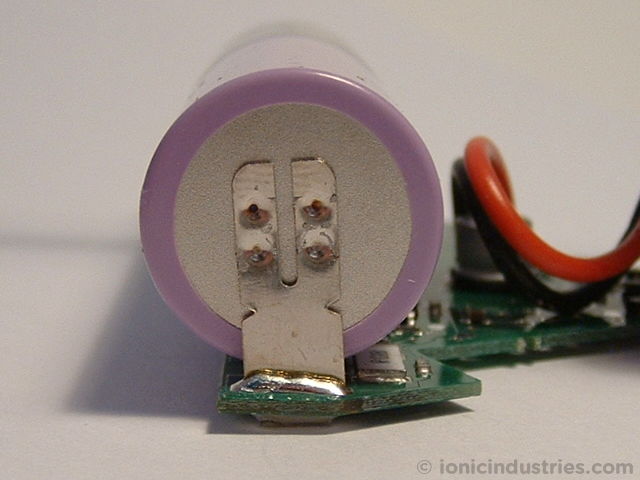
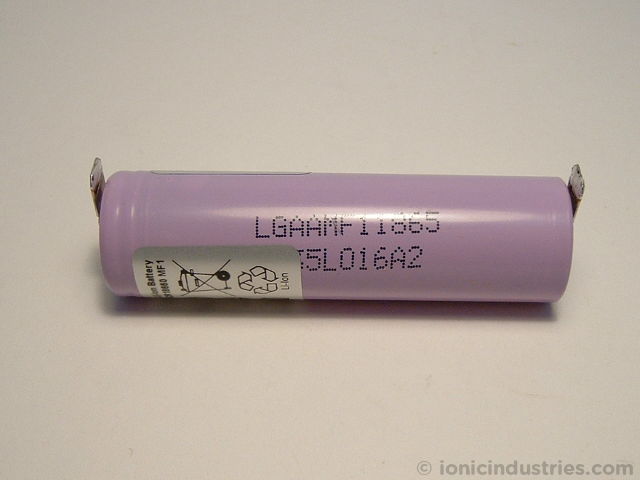
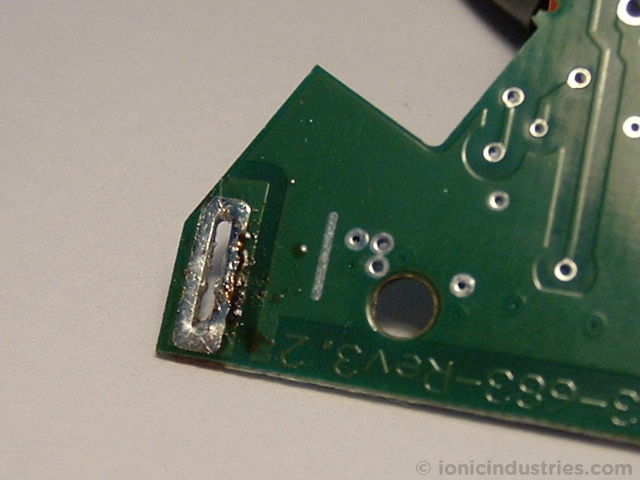
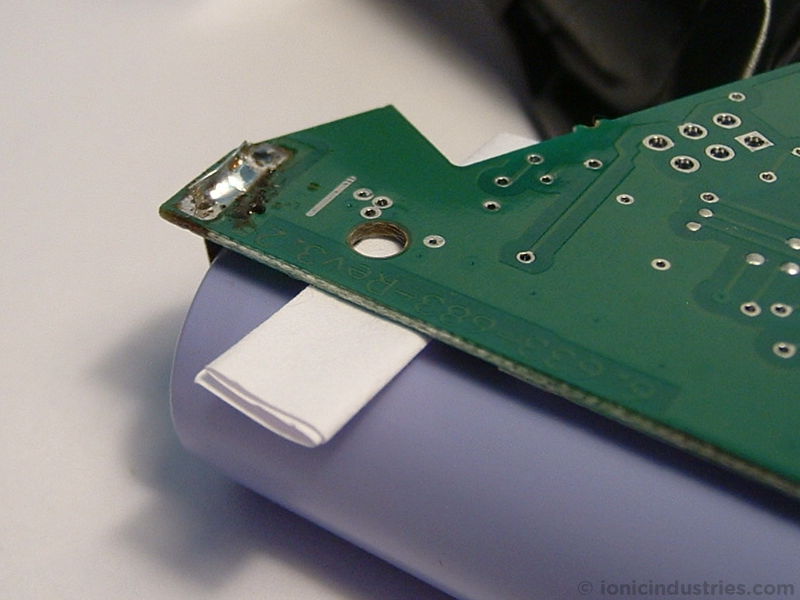
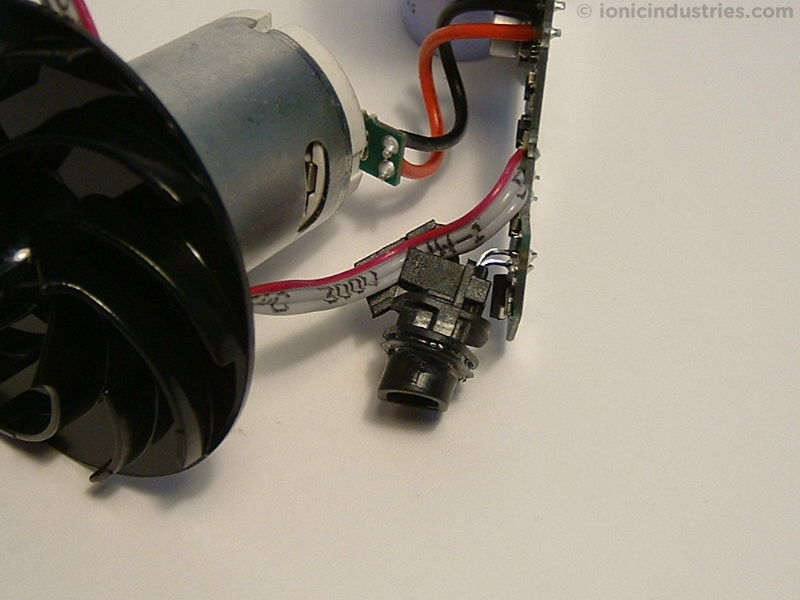
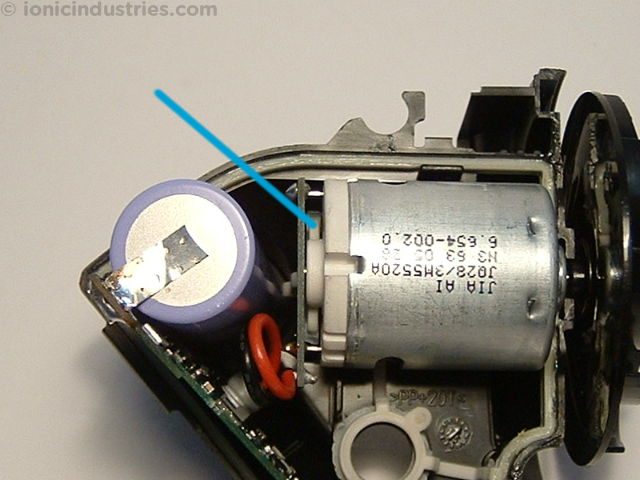
Note the 2 ends of the battery. This is a 3.7V Lithium-ion cell with 6mm wide solder tags welded to each end. Positive end:

Negative end:
Time to get your soldering iron warmed up now! While you’re waiting cover the metal can of the motor with insulating tape to stop it touching and shorting out the PCB components during the following steps. Also fold a piece over the tip of a large flat-bladed screwdriver.
Starting at the positive end of the battery, heat up the solder joint on the PCB while simultaneously prying the battery away from the PCB with the large screwdriver. Lift it clear by a few millimetres.
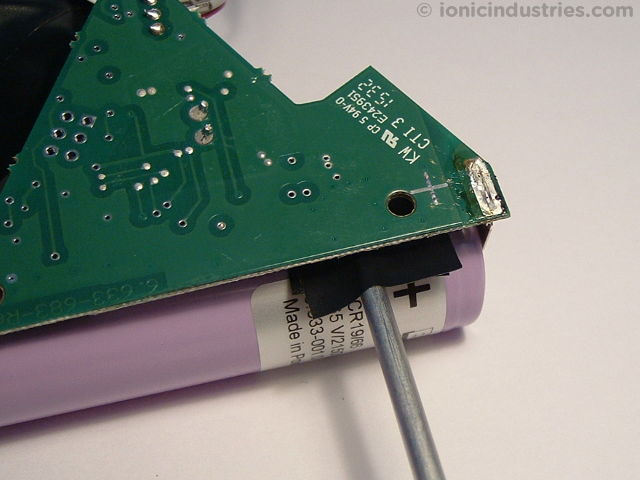
Do the same at the negative end of the battery.

Remove the battery from the PCB and put it somewhere safe where it can’t short out against anything.
Using the soldering iron and a desoldering pump, desoldering braid or craft knife clean up the PCB slots so they are clear and ready to accept the replacement battery.
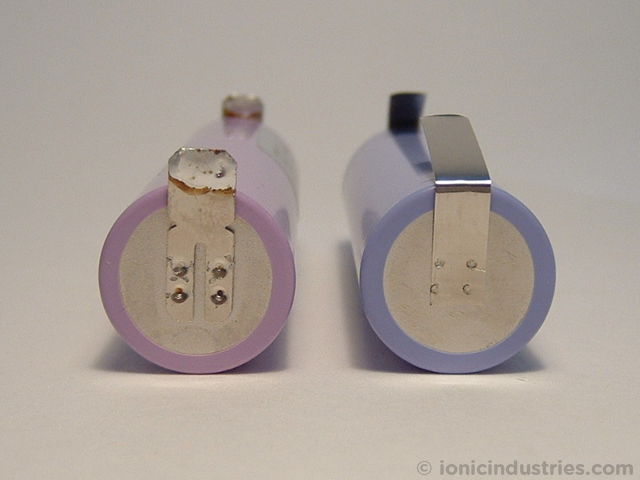
Compare the original battery (on the left) with its replacement (on the right.) This replacement has 5mm wide tags which will fit more easily through the holes in the PCB. Please support us in writing these repair guides by buying your replacement battery from us at Ionic Industries here. Positive ends:
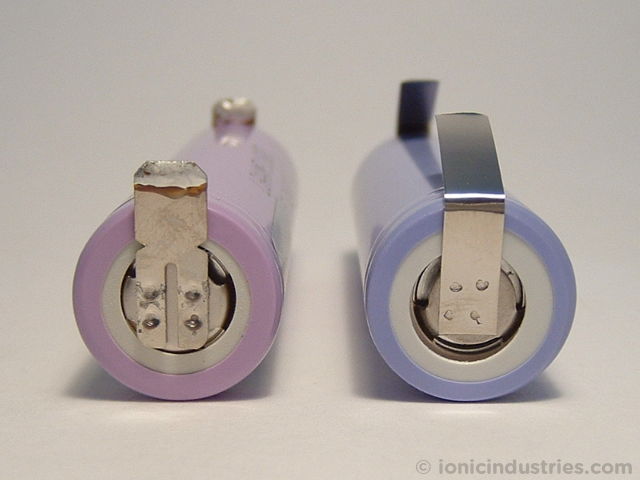
Negative ends:
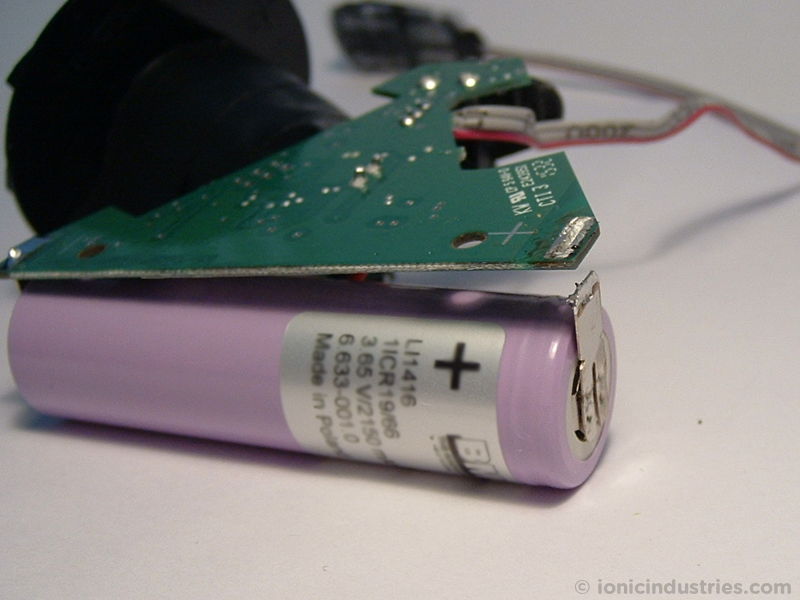
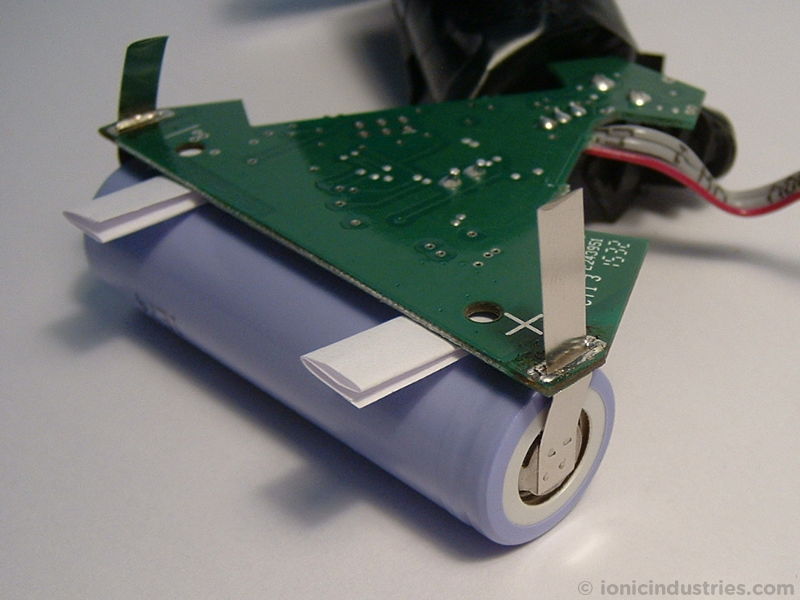
Straighten the solder tags on the new battery and test-fit it to the PCB. Observe correct polarity! The positive end of the battery has a groove around the outside.
Make sure you fit the battery to the correct side of the PCB. It goes on the same side as the other components. Use some folded pieces of paper or some thin card to keep the battery slightly clear of the PCB and other components.
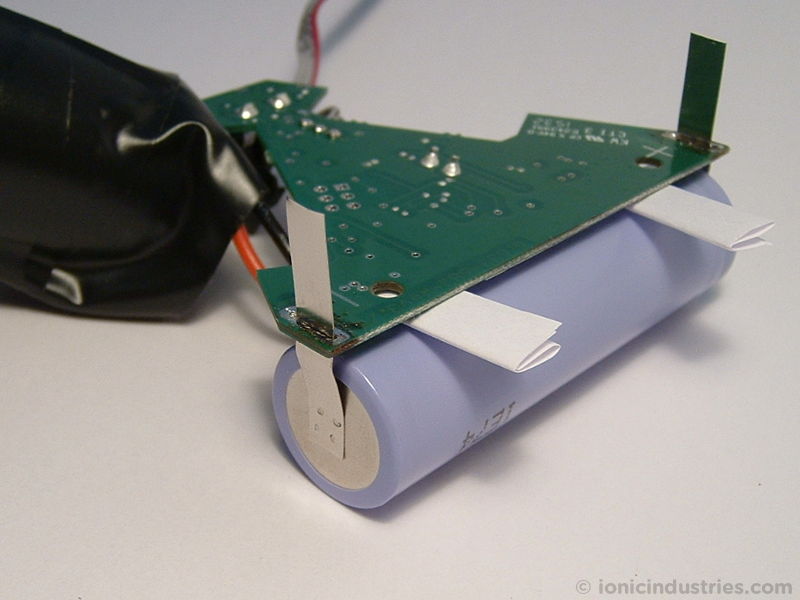
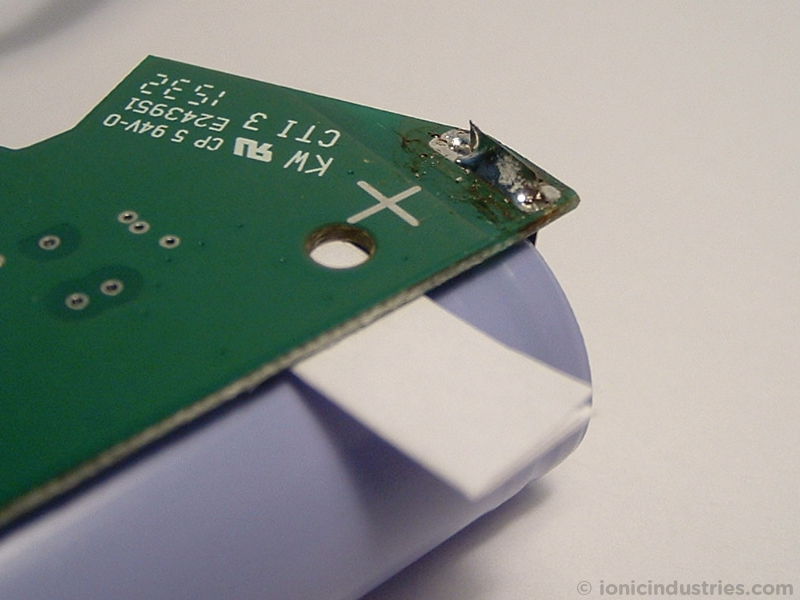
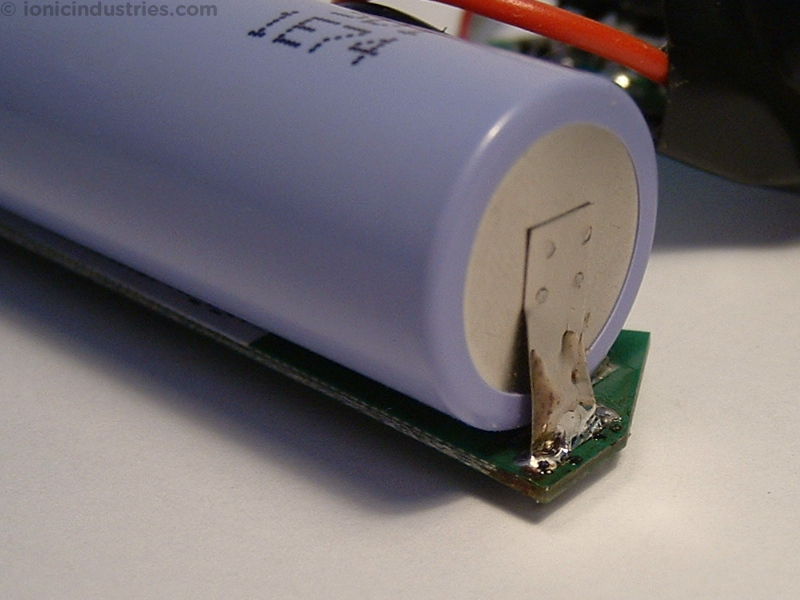
Trim the solder tags to length with some sharp scissors and then solder the battery in place. Make sure you solder all the way round the slots. Positive terminal:
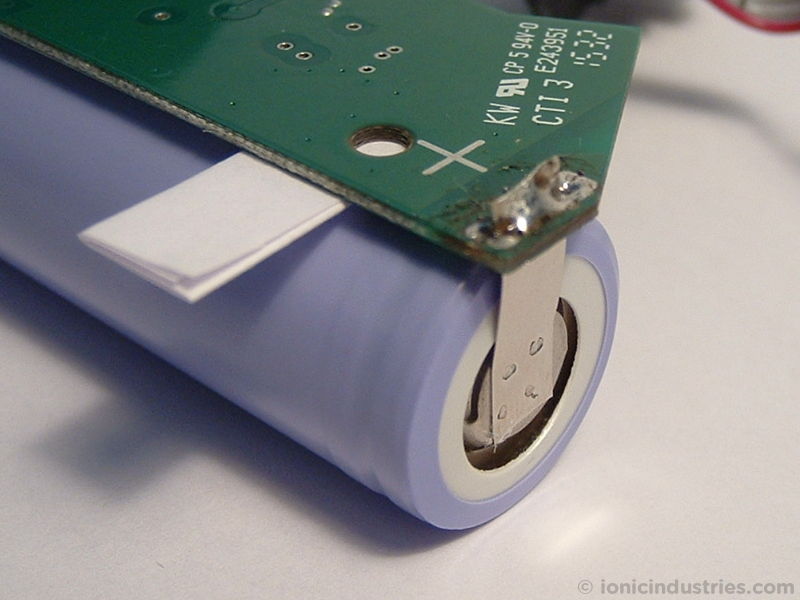
Negative terminal:
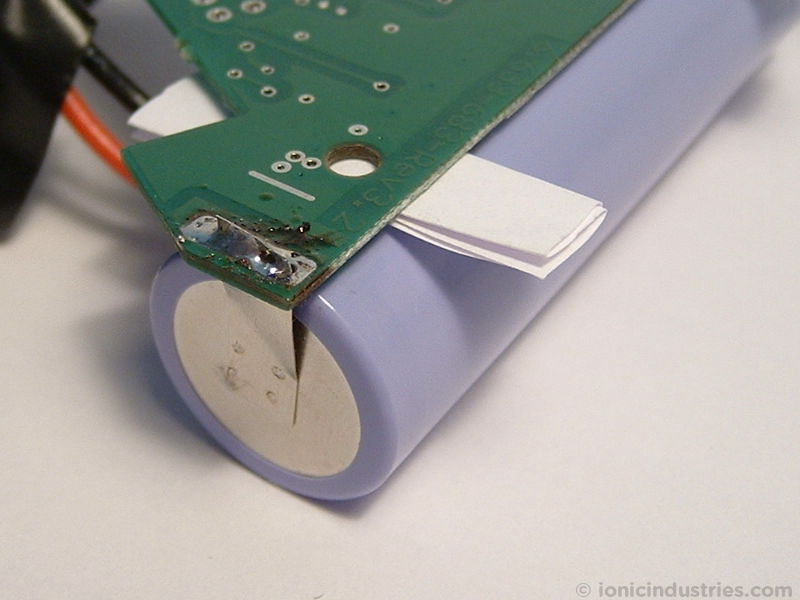
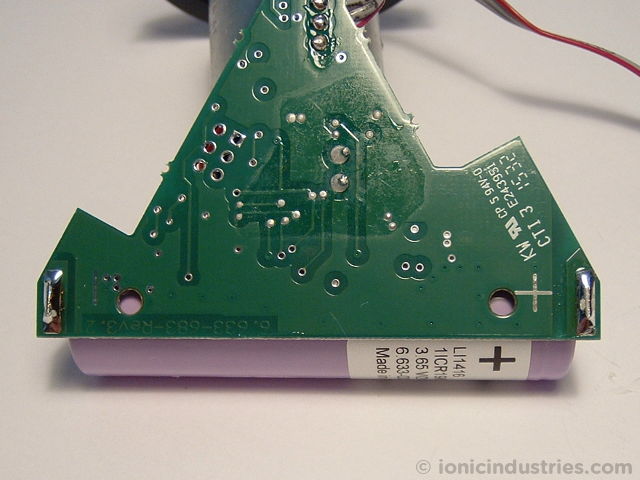
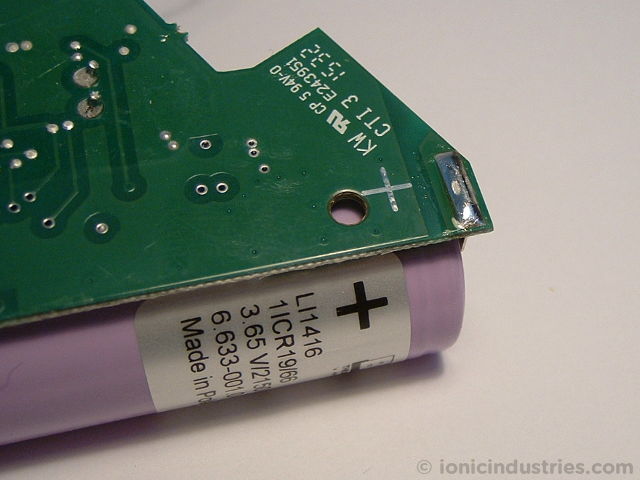
The PCB has tracks on both sides so also solder the outer surface of the solder tags to the PCB on the component side of the board.

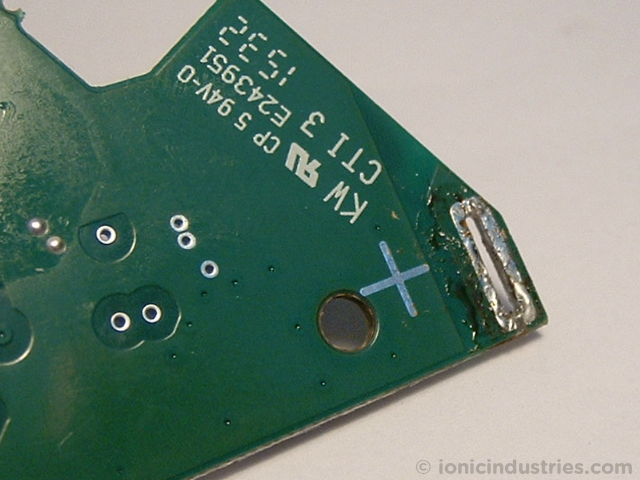
The completed PCB:
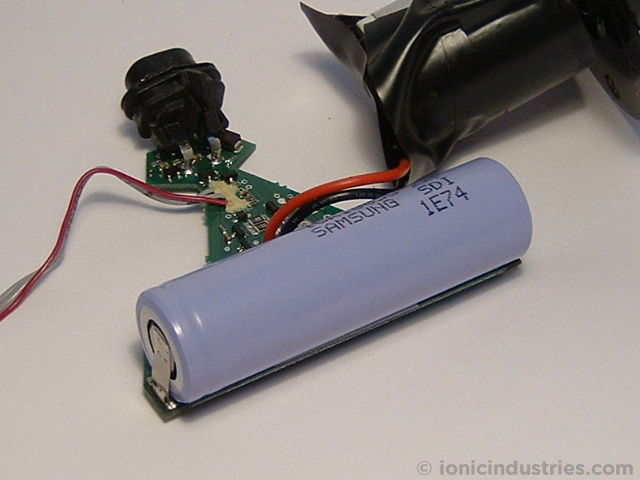
You can now peel off the insulation tape from the motor.
The new battery will have some charge in it so if you like you can test the new battery by holding the motor by its metal can so the impeller is clear of obstruction and then pressing the power switch.
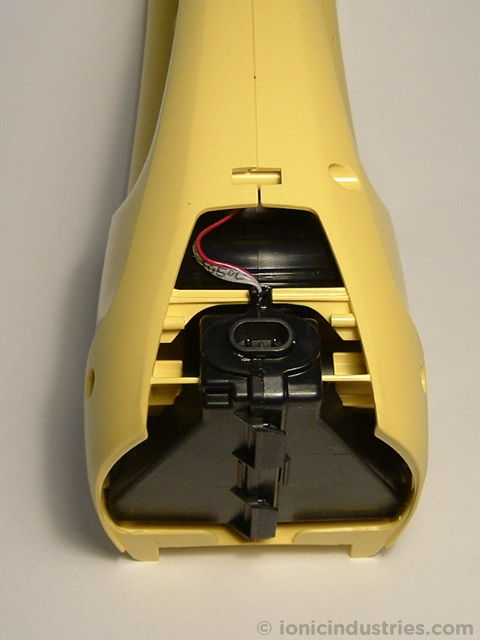
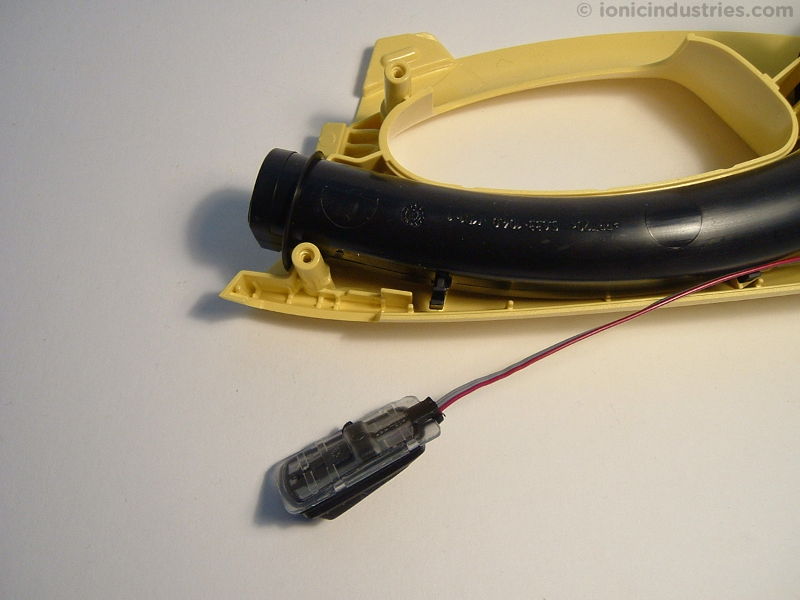
The first step in reassembly is to make sure the power switch cable is still clipped in place to the top of the charging socket.
Loosely fit the PCB and motor to the piece of motor housing as shown.
Check that the power switch cable runs through its groove in the seal.
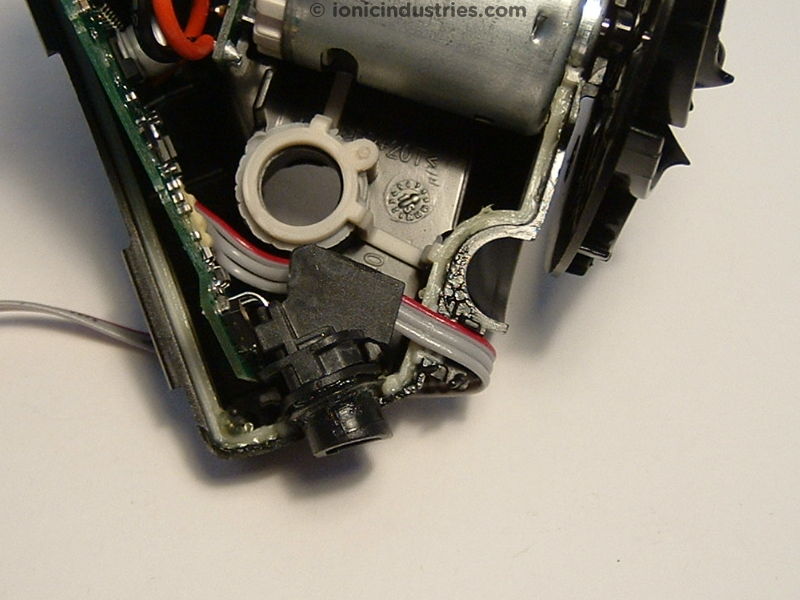
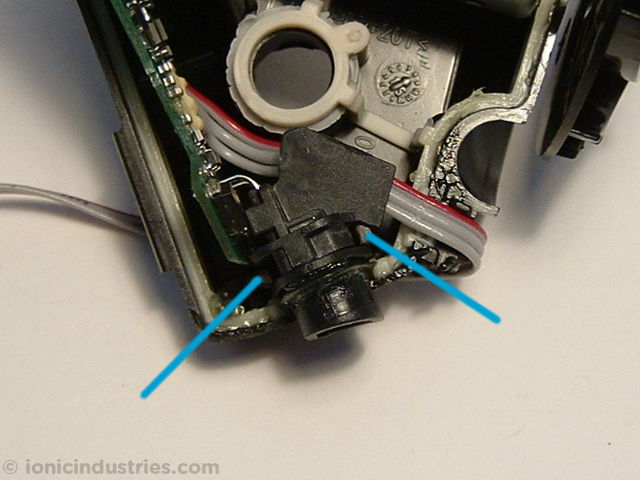
Check that the charging socket is positioned between the two clips, arrowed below, and press it home making sure the battery is in its cavity.
Check that both ends of the motor are lined up in the grooves and that the mini-PCB on the back of the motor is level and around the clips, arrowed below.
Clip the other piece of the motor housing into place, making sure the power switch cable is still in place.
Make sure all 3 clips are fastened. There might be a gap between the two halves of the motor housing near the charging socket and power switch cable. This is normal and will be closed up when the Window Vac is fully assembled.

Keeping your hands clear of the impeller blades, hold the motor housing and press the power switch to turn on the unit and check it runs without rubbing. If it rubs check the alignment of the motor inside the housing. If it does not run check your soldering and the battery polarity.

Clip the suction pipe back onto the motor housing making sure that the clips are engaged.
Place the assembly back in the main body and carefully push the power switch back into place, then starting at the switch end re-fit the cable into its clips.

Fit the other half of the main body and drop the 6 screws into their holes.
With the Torx screwdriver first turn the screws anti-clockwise until they click. This will avoid cross-threading them. Then tighten the screws clockwise until they’re snug.
Starting at the furthest edge from the charging socket, clip the black base cover back onto the Window Vac and then re-fit the water reservoir and blade assembly.
You now have a fully repaired Karcher Window Vac!
Plug your Window Vac into its charger for a full charge. An upgraded, higher capacity battery might take longer to recharge than the original battery but it will run for longer between charge-ups. You can also start using it before it is fully charged as this will not harm the battery.
Please tape over the terminals on your old battery to prevent short-circuits and recycle it at your local civic amenity or supermarket battery collection point.
You can leave any hints, tips and questions about how to fix your Window Vac in the comments section below.
Frequently Asked Questions
To replace the battery in your Window Vac follow our comprehensive photographic guide. We show you how to open up the Window Vac casing, remove the old battery and fit the replacement battery.
Nearly all Window Vac models are fitted with a 65mm x 18mm cylindrical Li-ion battery. These are available from us here. The WV5 model has an external, clip-on battery pack.
The model number for your Window Vac is normally marked on the body of the Window Vac behind the water tank and starts with the letters ‘WV’. Unclip the water tank to reveal the model number.
This must be one of the best ‘how to’ guides on YouTube! VERY clear instructions and pictures. Unfortunately, the fault on my Karcher appears to be in the PCB itself…
Thanks Peter! Try checking the PCB for water damage. If a track is damaged you might be able to bypass it by soldering a wire in place.
Fantastic how to site. Probably the best I have come across (I have done quite a few) but how do i decipher that it is not the charger (or its connection port) that is broken, and not the battery?
Does your Window Vac charge and run at all, even if it’s just for a minute?
This guide to replacing the rechargeable battery on the Karcher WV2 is really well done. Thank you, ionic. But what a daunting, intricate job it is just to replace a battery. The device is really useful but if one has to go through this kerfuffle every time the battery fails, does it not suggest a very poor design?
It suggests that it’s not designed to be repaired, but for the Karcher to be thrown away and a whole new one bought!
Wow, Amazing tutorial! Very detailed and very good pictures. Thank you Ionic! I’ve managed to open the motor housing and I’ve found traces of a huge flood: very much rust on the metal parts, contacts and motor body. But the wheel (and motor) is spinning freely. My window vac is not charging anymore, no led indicator. I suspect that the water burn some electronics on the PCB, but the battery is looking good (besides the rust on the tags). I have 2 variants: (a) either replace the PCB, or (b) either try to bypass the PCB by soldering/tightening 2 wires on the battery, trying to charge it (I have the charging station from Kaercher for WV5 window vac). Can you help me telling for (a) where can I found a replacement for PCB (and the model/code)? The (b) variant is feasible? Will it work the assembly once the battery is charged? Thank you
Hi Max, glad the tutorial was helpful!
(a) Unfortunately I don’t know where to get a replacement WindowVac PCB, maybe from another Window Vac that has a dead battery?
(b) Do not connect the charger directly to the lithium-ion cell. There is important battery management circuitry on the PCB that must be connected between the charger and the cell to stop it from over-charging.
Sorry I can’t be more help 🙂
Thank you for info. Regarding b) I’ve mentioned that I already have the charging station from Kaercher for WV5 window vac and I think this device contain the necessary electronics for (balance?) charging the li-ion batteries. Actually, it has two ports where I can charge simultaneously both the battery inside the vac and another replaceable battery (provided by Kaercher). I can provide some pictures (of the charger and the battery if I may, but also you can find them on the net. My question is about the third connector of the charger: what is its role? A ground connector or is a connector for charging the cells inside the battery? Does the battery has multiple cells?
Regarding the removable WV5 battery, it looks like the third connector pin is possibly for a temperature sensor. There might also be battery management circuitry inside the plastic casing of the WV5 battery. It looks like it is a single cell inside the casing as it’s rated at 3.7V.
Excellent tutorial. Unfortunately for me I think it’s not my battery but the on/off switch. After several attempts the VW2 switched on but then wouldn’t switch off until the battery was discharged. Do you have a similar tutorial for switch replacement and where can I buy one?
Unless Karcher can supply a replacement switch for your WindowVac you’d have to fit a generic waterproof switch instead 🙁
What’s a generic switch mate and what does it look like?
I’m not sure if your WindowVac has a momentary or latching switch. You can get a waterproof equivalent from Maplin, RS Components or CPC. You will need to drill a hole for it somewhere suitable in the WindowVac casing and wire it up correctly. If your original switch lights up you probably don’t need that function in the new switch.
I have a similar fault on my wv1 won’t switch off. Not the switch. Just bridge the two contacts with say a screwdriver to prove it’s ok. Sure you will find a replacement if required https://www.ebay.co.uk/itm/Momentary-Tactile-Switch-SPST-Push-Button-Miniature-Micro-PCB-Mounted/251356012322
Can any 1 help please my karcher light is on when charger is in but when take it out it goes off is that just a new battery I need please help some 1
What model of WindowVac do you have? And does the motor run at all after charging for a few hours?
I put a 3.7v Ultrafire fully charged in it and the red light flashes, it briefly starts then turns off. Anyone know why?
Maybe the battery I’m using isn’t lithium, would that matter?
There are no markings on the Ultrafire for mAh as it rubbed off. If it is not 2100mAh like the original would that prevent it working?
If I put a working Karcher battery into the unit it powers on fine.
Any ideas why this isn’t working?
Can I use a 3.7v cell out of a laptop battery?
Ultrafire batteries are infamous for being unreliable. Use a good quality LG/Samsung/Sanyo/Sony cell with the solder tags pre-welded in place. Follow the link to our Karcher Winbdow Vac battery page for a suitable replacement from a trusted brand.
Just wanted to add that I used your superb tutorial to lead me to the non working internals for a repair.
My very common symptom was a green light flashing when switched on but no suck. Suspecting a seized motor I nearly gave up as the fan spun nicely. Couldn’t figure it till I held part rusty motor in my hand and when I switched it on and felt a tiny kick, so I then knew fault was inside the motor.
When i pulled the fan off I realised that the fan had spun freely sure enough – but the motor didn’t. Minor seize up. (Best part was someone else before me had got that far, but gave up).
Freed the motor – couple of drops of machine oil and some super-glue for the blade and re-assemble.
WHY dont you do a seized motor tutorial (and point out my near miss 🙂 )
A lot of peeps will like you for it, and you might recommend that they replace the battery (that you will be happy to supply) at the same time as that would be good practice. 🙂
same green light- but alas free motor.
Green light only flashes when switched on – not when off with charger connected.
Have checked charger voltage – OK. Bat voltage circa 3.09 – should be 3.3.
Does this sound conclusive need new bat?
The battery voltage when fully charged, measured at the battery terminals, should be just over 4 volts (4.2V maximum.)
This link:
This replacement has 5mm wide tags which will fit more easily through the holes in the PCB and is available online here.
Takes you to this battery:
Karcher Replacement Battery Window Vacuum VAC Cleaner VW60 VW70 VW75 PLUS Li-Ion
I want a battery the same as what your article and video is about – a VW2
Any ideas?
It’s a suitable replacement. V W is just a typo of W V. The battery listed is suitable – you can always contact the seller to make sure, stating your Window Vac model.
Hello, I am looking for an SOT-23 semiconductor for the windows vac. It is located near by the charging socket. Do you have some good hi-res pictures of this pcb area to check which part is needed?
Sorry, we have no photos of those components. Is the transistor burnt out? It could be similar specification to the other transistors on the PCB.
Thank you! I have to try this! Just one problem – how to get a battery shipped to Sweden. Anyone who know´s another shop to buy them from? Shipping to Sweden.
Hi Lena, this eBay seller offers Karcher batteries with shipping to Sweden and various other countries. Hope that helps!
Thank you for the clearest guide on the internet to this particular problem. I’m sure that you could have an alternative career as a technical writer. We have to rebel against our throw-away society.
Excellent tutorial, battery replacement done in 30 min. As an engineer I must say that the design must be done by purpose and make anyone to just buy a new unit. shame on the designers 🙁
Totally agree with Paul on the poor design. I stripped my WV2 before finding this site. What voltage is the motor? as my PCB is knacked (led light flashes all the time but no motor due to water damage) although charging now after clean up( checking that voltage does’t rise above 4.2V). Will do a botch job if voltage is same as battery.
When fitting both sides of the motor enclosure together would it be a good idea the smear Vaseline on the joints to try and stop the designed water leaks?
The motor is probably rated at 4.5V or 5V. Good idea to use vaseline, silicone grease or even silicone sealant around the joints of the enclosure.
Thanks to your posts I was able to repair my wv2, it was just a sticky motor. John in cyprus
We have a 4 year old Karcher WV2. A week ago it stopped working and with your excellent guide I stripped the unit. It looked as good as new and there had been no water leakage into the motor/pcb area. Some very light oil on the motor bearings and a couple flicks of the impeller and it was working fine again.
Luck didn’t last long! Today it is completely dead and with no lights. The charger has a healthy 5.9v output when measured on the pcb. The WV2 has the 3.65v battery. Voltage across the switch is 1.3v and there is only 1.3v across the battery with, and without, the charger connected.
Clearly the battery will not charge sufficiently with only 1.3v input so I am reluctant to buy another battery. I would have expected a gradual decline with an old battery, getting slower & slower as the charge & voltage dropped, not OK yesterday & dead today.
Do you have any ideas or things I could try, or measure, in order to fix the vac please?
Hi Mark,
A healthy Li-ion battery will not have a voltage below 2.4V, even under load. If the battery is measuring 1.3V when not in use then it is faulty 🙁
Dear Sirs,
Thanks for your quick reply and I agree with you that 1.3v when resting would be no good.
Regardless of whether the charger is ON or OFF, the battery voltage remains the same at 1.3v.
I would have expected the voltage across the battery to rise when the charger is ON, so could this indicate a fault within the pcb circuitry? Would it not need a charging voltage of 2v or so to charge sufficiently to rest at 1.3v?
Also, I’m only getting 1.3v across the switch with charger both on and off.
Do you know of any simple test that I can do to confirm whether the pcb is charging correctly or not – other than by fitting a new battery please? Any help you can offer would be most welcome. Thanks again, Mark.
If the Li-ion battery is reading less than 2.4V when disconnected then it is probably no good. Other than fitting another battery I don’t think there is a safe/reliable way to test the charging circuitry.
Dear Sirs,
Do any of your site’s contributors / writers have any knowledge regarding open circuit voltage, will the pcb/charging circuit be damaged without having a battery connected?
My thoughts are if it is safe to do this, we would get the voltage available to charge ie 4 – 5v. This would then prove the pcb and point to the battery being at fault – possibly a short circuit within its pack that could then pull the voltage down to the 1.3v I mentioned. What do you think of this plan, it all depends on doing a safe open circuit test ???
Anyone knowledgeable out there please?
There must be scores of other people trying to prove a pcb vs battery fault.
Thanks again, Mark.
Spoke to an electronics friend of mine and he said it should be OK to desolder the battery for an open circuit voltage test as the charging current is low.
I removed the battery and found the pcb voltage to be much too low ie 0.9v.
The circuit board is therefore faulty so condemning the vacuum.
Will keep the battery though as this should be OK for any future use.
Hope this will be of help to others.
Mark.
Thanks for the tip Mark!
I had a dead WV2, on inspection the battery was completely flat and not charging. I clamped an external Li-ion charger on to the battery on the circuit board and the voltage slowly started to rise. After 3 hours the motor started to work. I reassembled the unit and it is now charging and working as normal. Miraculous.
Hi i have problem with motherboard it oxidized, but the motor and battery worked. Does anyone know where to buy a motherboard? to come to Croatia
Thanks
Hi a great guide – I have a WV1 which looks very similar – any idea if the battery is the same as the WV2? Battery has label showing: KI 1016, 1/CR 19/66 3.65V/2150 mAh 6.633-001.0 – made by BMZ in Poland…
Hi Steve, Yes it’s the same battery in your WV1 as the WV2 so you can use our Window Vac battery in your WV1.
I have a wv50 which will not charge because red light is flashing when plugged into charger. Is this a faulty battery?
I have it stripped and am ready to carry out repair. Just trying to identify problem
Many thanks.
The flashing red light could be one of several faults. Are you able to measure the voltage of the battery in-circuit using a voltmeter?
I have a never used WV 50. When I plug it in to charge, the red light stays solid, but the unit won’t run.
Took a look at your excellent tutorial, but my battery and board look completely different.
My board is rectangular with a red wire and a black wire soldered onto it. The wires terminate in flat metal tabs like you show (with a black shield), but those tabs have 4 spot welds holding them onto the positive and negative ends of the battery. The red 3.7v battery is marked Sanyo 1UR18650S, 3.7v, 1.1Ah, 4.1Wh, made in Japan.
Is there a replacement battery with these specs that has the flat metal tabs already welded to it but unsoldered black and red wires? That way, I could remove the current battery and resolder the new one to the board.
Thanks.
Hi Terry, We only offer batteries with the tags fitted, not with wires. It sounds like you could cut the wires where they meet the tags on your old battery, then strip and solder the wires to the tags on the new battery. Our replacement batteries are the correct spec to replace the original Sanyo battery in your Karcher WV50 and will be an upgrade in capacity giving you a longer running time between charge-ups.
Hi,
Great tutorial, changed battery no issue. However, even though about 3.7V across battery and over 5V from charger, there is a RAPID green flashing light on the switch for about a minute, it then switches off but it doesn’t matter when I press the on/off button, the motor doesn’t run. The motor shaft moves fine (oiled it anyway). Any ideas what else I should check?
Many thanks.
Check the WindowVac PCB for signs of water damage i.e. corrosion or crystalline growth. This can lead to damaged PCB components.
Hiya
Apologies for a daft question…
Do you know the specs for the t8 torx screw? And do you know if they can be sourced from anywhere?
Some of the torx heads are a bit iffy..
Great guide btw.. although mine is a wv70!! I think it’s an early model 🙂
You can probably replace them with similar size pozi-head self-tapping screws. If you take one of your Torx screws to a hardware/fixings shop they’ll be able to match the thread for you. Let us know how you get on!
Hi fantastic tutorial
Got my WV2 apart
My issue is WV2 will turn on and motor runs but won’t turn off when pressing switch – motor stops only when charger plugged in !!
Does this mean faulty switch ??
Cheers Thomas
There could be damage to the PCB causing faulty logic. Is there any corrosion, staining or deposits on the PCB?
Thank you for tutorial!
Successfully replaced bad battery by a new cell with bigger capacity.
Always important to know where these plastic clips are located…. 🙂
Excellent tutorial! However, my WV50 has got some water on the PCB and some of the resistors are damaged. It is not a problem to restore dissolved conductors and clean the deposits. But it is impossible to read markings on the resistors. I wonder if somebody can provide hi-res picture of the component side of the PCB? Searching the web returned no results.
Thank you in advance!
Green charging light remains lit even when unplugged from supply – any suggestions?
Has there been any water getting into the electrics, particularly onto the PCB?
Anyone know where I can purchase a replacement motor for a WV55 Window Vac?
Your best bet for a replacement Window Vac motor is on eBay here. Many of the models will have interchangeable motors.
My Karcher WV2 runs for about 5 secs then stops with flashing light. I plug in the charger and it flashes (charges ) for about 30secs then goes solid green indicating charged (obviously not). I try it again and it goes for about 5 secs then stops with flashing light, Repeat ad nauseum.
Does this indicate duff battery, charger or circuitry?
Many thanks
It could be either the battery or circuitry. Your best bet is to open up the Window Vac and check the PCB for obvious water damage. There could be staining, corrosion or crystal deposits on it. If it all looks fine then it’s more likely to be the battery at fault, especially if it is measuring under 2.5V after running the motor until it shuts off.
Does any one know where to get a replacement motor for the window vac?
Thanks in advance!
Check out our Window Vac spare parts page for motor vendors.
Thank you for an excellent tutorial. I replaced the battery on my WV2 and all was working well until I replaced the suction pipe on the motor housing cover. It still works but is making a grating noise as if it’s rubbing against the cover.
It sounds like the motor might not be seated correctly, or the suction pipe has not fully clipped in place and is rubbing on the fan.
Hello,
I have a karcher window vac v2, when turning it on the green light flashes and then after 10 seconds or so it switches itself off, I have opened-up the unit and looking at the PCB board there seems to be no water damage or corrosion. I have also replaced the battery on the unit. Also when I put the unit on charge the light doesn’t come on any ideas to what it could be ?? The motor also has slight rusting on it so i have ordered another one.
Hello Vivek, this could be a fault with your charger or with the charging circuitry on the PCB. If you have a friend or relative with a Window Vac charger you could borrow try using that to charge your Window Vac.
Undoubtedly the best diy manual I have ever used.
Particular praise for the amount of general guidance/suggestions.
Brilliantly put together – both the text and the pictures.
It may have taken quite a time, but I obtained a first effort 100% success,
Thanks!
Hello,
on the board is a tiny IC (6legs). Unfortunately, during the repair I lost it, do you know what it is? or just a purpose? I somehow worked without for a few minutes.
Hi
Fantastic instructions. I would have purchased a new one. At the moment, after following the instruction, it’s working. Fingers crossed.
Cheers
Hello,
I restored my karcher window vac vw2, it wouldn’t charge its battery anymore. The battery was still good. In addition to the connections (3) of the power switch on the pcb, there is a voltage divider with 2 resistors (471=470ohm and 821=820ohm). A capacitor is placed across the 820ohm resistor as a filter. This one was faulty for me. I replaced it with 100nF. I think this voltage divider measures the voltage of the adapter and that way the CPU (ATTiny441) knows that it can be charged. Hopefully I can help someone with this info.
Alas, despite successful soldering the new battery onto the Karcher Vac WV2 (no release of magic smoke), the unit is still dead.
No lights on the switch if I attach the charger (which is outputting 6V). Neither does the motor spin if I try switching the device on.
So I suspect it is a fault on the circuit board somewhere, which did look somewhat corroded when I opened the unit up.
While it was worth a try replacing the battery, it looks like the unit is beyond repair.
So I think I’ll buy a new window vac rather than try and diagnose the fault any further.
Excellent guide, thanks for providing it.
I soldered a new battery purchased from you today and it worked straight away. 🙂
My symptom was the charge light not coming on. The whole unit was dead. I replaced the battery thanks to your great tutorial! The charge light then came on and the unit worked for one batteries worth. When it was plugged back in to charge up again, the same symptom occurred. No light, no charge and the unit was dead.
I took it apart again and found a similar thing to before. The volts from the charger were present on the solder tags of the dc input connector, but there was nothing across the battery. It actually measured a short. I desoldered the battery and found there were then volts on the battery terminals of the pcb. The battery measured very low voltage (<0.5V). I've resoldered the larger joints to see if it was a dry joint somewhere but the only connectors that's possible on are the three to the switch, the dc input connector and the two to the motor so unlikely to help I figure. There is a bit of rust on the motor case but the pcb looks ok in all other respects. Any suggestions would be much appreciated. Thanks again for helping us all repair rather than replace.
This sounds like a problem with the battery management circuitry on the PCB. It is not charging the battery and has also over-discharged the batteries which should always be above 3.0V. The rust on the motor is a symptom of water getting into the motor/battery compartment so this is what has likely damaged the PCB.